| LMD-1BV Single Button Visor Transmitter |  | ||
| Overview | Technical Specifications | ||
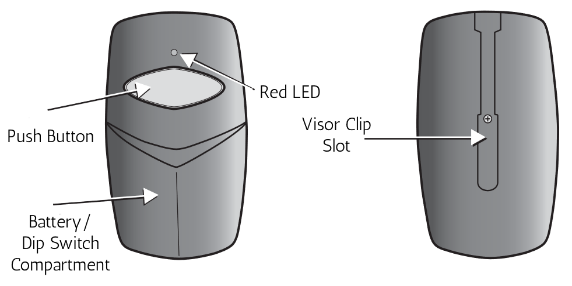
| The LMD-1BV remote from Door Openers and More is a visor style transmitter operating at 390 MHz. The small size is achieved by using state-of-the-art surface mount components. It has been designed for use with and is compatible with Chamberlain®, Liftmaster® and Sears® garage door openers with dip-switch receivers.Chamberlain, Liftmaster and Sears are trademarks of their respective manufacturers. | Frequency | 390 MHz | |
| Battery | 12V A23 | ||
| Combinations | 1 billion | ||
| Operating Temperature | -20°F-100°F | ||
 |  | ||
| Programming | |||
| First things first—you may need a ladder or step-stool and a small screwdriver to complete programming. Do you have an existing remote? If yes, start at Section BYou don’t have an existing remote? No problem! Go to the next section. | |||
| Section A: Programming your Remote Using the “Learn” Button | |||
| |||
 | |||
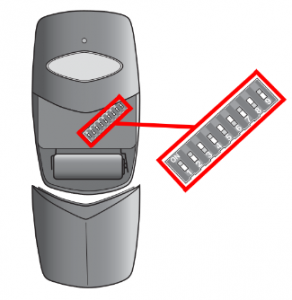
| Section B: Programming your Remote by Coding Dip Switches to your Opener or Existing Single-Button Remote | |||
| One more thing—does your existing remote have 3 buttons? If yes, follow the instructions in Section C. There are additional steps to perform that are unique to 3-button remotes. | |||
| |||
| Section C: Programming your Remote by Coding Dip Switches to your Existing 3-Button Remote | |||
| When your existing remote uses 3 buttons the programming requires an extra step. On your existing remote the 3 buttons are coded to the + (Up), 0 (Middle), and – (Down) positions of the dip switches. |  | ||
On your new remote the first dip switch will be set to the position which corresponds to the button on the existing remote used to operate your opener.For example: If you use the middle button on your 3-button remote the first dip switch on your new remote will be set to “0”, or the middle position. After setting the first dip switch on your new remote you will match the dipswitches to the same positions on the existing remote.Explained in steps…
| |||